Teleporting Between Places
Teleporting Between Places
Very large worlds may perform better when teleportation is implemented. For instance, if a fantasy world has several towns, a castle, multiple large dungeons, and a vast haunted forest, making each a separate articles/games and places|place and teleporting players between them at specific points would improve performance.
In Roblox, TeleportService/TeleportAsync handles teleporting players between places in a universe or even to another experience. This method accepts three parameters:
- The place ID that the player(s) teleport to.
- An array containing the
Playerinstances to teleport. - An optional
TeleportOptionsinstance that contains properties for theTeleportService/TeleportAsync|TeleportAsynccall, as well as a function to specify teleport data.
local Players = game:GetService("Players")
local TeleportService = game:GetService("TeleportService")

local TARGET_PLACE_ID = 1818 -- replace with your own place ID

local playerToTeleport = Players:GetPlayers()[1] -- get the first player in the game

TeleportService:TeleportAsync(TARGET_PLACE_ID, {playerToTeleport})
Enabling Third Party Teleports
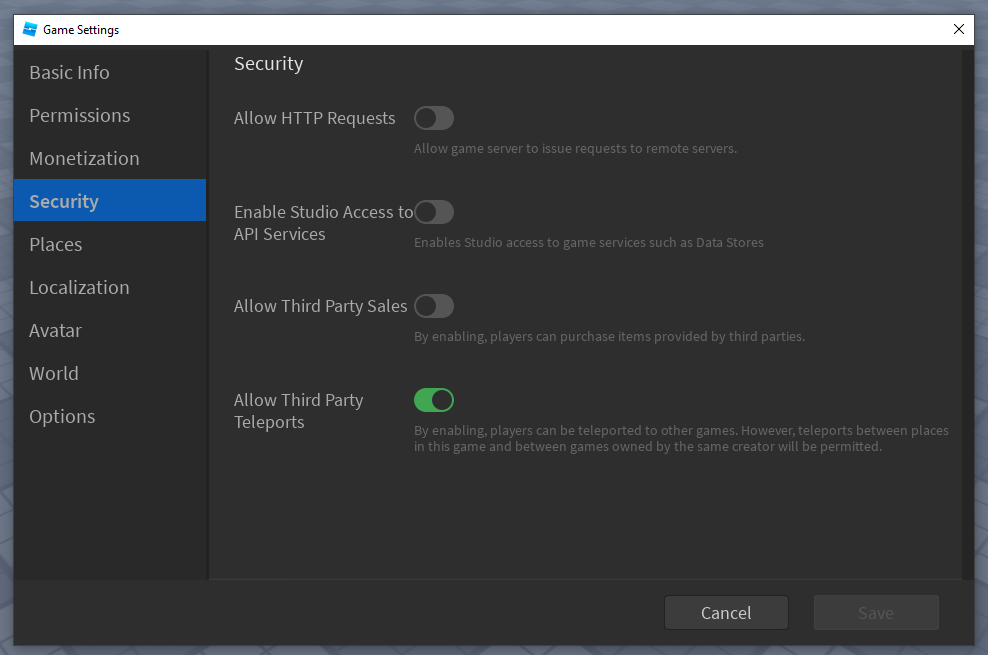
For security purposes, the ability to teleport a player to an experience owned by a third party is disabled by default. To enable third-party teleports, open Game Settings > Security and enable “Allow Third Party Teleports.”
Usage Notes
TeleportService/TeleportAsync|TeleportAsyncis restricted to server-side invocation to reduce client-side exploitation.TeleportServicefunctionality does not work during playtesting in Roblox Studio — to test the concepts in this article, you must publish the game and play it in the Roblox application.
Handling Failed Teleports
Much like any call that involves network requests, teleports have the potential to fail and throw an error. Always wrap teleports in a protected call (pcall) and retry if failed.
Even if a call succeeds and the teleport initiates, it can still fail at the last moment without throwing an error and leave the player in the server. When this happens, TeleportService/TeleportInitFailed is fired.
Because the logic required to safely teleport a player is complex, this example integrates it into a ModuleScript for easy reuse.
local TeleportService = game:GetService("TeleportService")

local ATTEMPT_LIMIT = 5
local RETRY_DELAY = 1
local FLOOD_DELAY = 15

local function SafeTeleport(placeId, players, options)
    local attemptIndex = 0
    local success, result -- define pcall results outside of loop so results can be reported later on

    repeat
        success, result = pcall(function()
            return TeleportService:TeleportAsync(placeId, players, options) -- teleport the player in a protected call to prevent erroring
        end)
        attemptIndex += 1
        if not success then
            task.wait(RETRY_DELAY)
        end
    until success or attemptIndex == ATTEMPT_LIMIT -- stop trying to teleport if call was successful, or if retry limit has been reached

    if not success then
        warn(result) -- print the failure reason to output
    end

    return success, result
end

local function handleFailedTeleport(player, teleportResult, errorMessage, targetPlaceId, teleportOptions)
    if teleportResult == Enum.TeleportResult.Flooded then
        task.wait(FLOOD_DELAY)
    elseif teleportResult == Enum.TeleportResult.Failure then
        task.wait(RETRY_DELAY)
    else
        -- if the teleport is invalid, don't retry, just report the error
        error(("Invalid teleport [%s]: %s"):format(teleportResult.Name, errorMessage))
    end

    SafeTeleport(targetPlaceId, {player}, teleportOptions)
end

TeleportService.TeleportInitFailed:Connect(handleFailedTeleport)

return SafeTeleport
This function has a limit on the amount of times it retries, because if the teleport fails several times in a row, there is likely an error in the code as opposed to an occasional network hiccup.
Putting this function into a ModuleScript allows its use from anywhere in the game. Since it receives the exact same arguments as the TeleportService/TeleportAsync|TeleportAsync function, the rest of the examples in this article use it.
local Players = game:GetService("Players")
local ServerScriptService = game:GetService("ServerScriptService")

local SafeTeleport = require(ServerScriptService.SafeTeleport)

local TARGET_PLACE_ID = 1818 -- replace with your own place ID

local playerToTeleport = Players:GetPlayers()[1] -- get the first player in the game

SafeTeleport(TARGET_PLACE_ID, {playerToTeleport})
Using Teleport Options
TeleportOptions is an instance that allows further customization of teleports. For example, enabling the TeleportOptions/ShouldReserveServer property creates a new server for the teleporting player(s).
local Players = game:GetService("Players")
local ServerScriptService = game:GetService("ServerScriptService")

local SafeTeleport = require(ServerScriptService.SafeTeleport)

local playersToTeleport = Players:GetPlayers()

local teleportOptions = Instance.new("TeleportOptions")

teleportOptions.ShouldReserveServer = true

SafeTeleport(game.PlaceId, playersToTeleport, teleportOptions)
Teleporting to Specific Servers
Providing additional information to the TeleportService/TeleportAsync|TeleportAsync function enables teleporting players to specific servers.
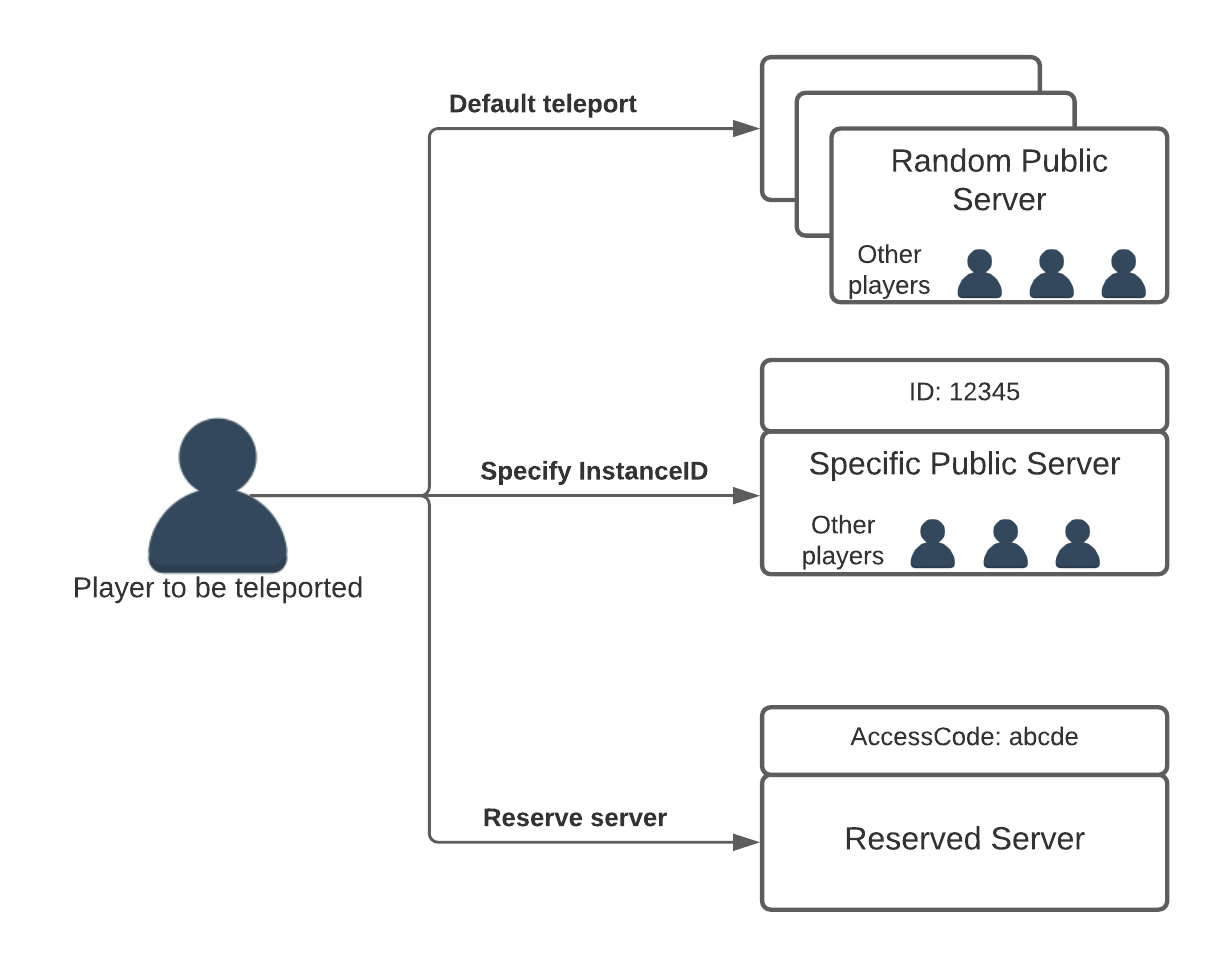
If no attempt is made to direct the player to a particular server, they are sorted into any public server. If the TeleportOptions/ServerInstanceId|ServerInstanceId property of the TeleportOptions object contains a valid instance ID, the player is teleported to that public server. If the TeleportOptions/ReservedServerAccessCode|ReservedServerAccessCode of the TeleportOptions object is set to a valid code, the player is teleported to that reserved server. If TeleportOptions/ShouldReserveServer is true, the player is teleported to a newly reserved server.
Instance IDs vs Reserved Server Codes
Though instance IDs and reserved server codes are similar in concept, they behave differently from one another.
The Instance ID is a unique identifier for the server, stored in DataModel/JobId. For public servers, this is used to teleport players into the server.
A reserved server code is a unique code used to enter a reserved server. This code can only be obtained from TeleportService/ReserveServer or a TeleportAsyncResult instance. The only way a player can join a reserved server is being teleported with the reserved server code.
Teleporting to a Specific Public Server
This example teleports a player to a specific public server using the server’s instance ID.
local Players = game:GetService("Players")
local ServerScriptService = game:GetService("ServerScriptService")

local SafeTeleport = require(ServerScriptService.SafeTeleport)

local playerToTeleport = Players:GetPlayers()[1] -- get the first player in the game
local targetServerId = "game.JobId of the server you want to move the player to"

local teleportOptions = Instance.new("TeleportOptions")
teleportOptions.ServerInstanceId = targetServerId

SafeTeleport(game.PlaceId, {playerToTeleport}, teleportOptions)
The target server will need to broadcast its server ID in order for another server to know where to teleport the player, typically through a service like MessagingService.
Teleporting to a Reserved Server
This example reserves a server and teleports a player to it using the generated reserved server code.
local Players = game:GetService("Players")
local ServerScriptService = game:GetService("ServerScriptService")

local SafeTeleport = require(ServerScriptService.SafeTeleport)

local playerToTeleport = Players:GetPlayers()[1] -- get the first player in the game
local reservedServerCode = TeleportService:ReserveServer(game.PlaceId)

local teleportOptions = Instance.new("TeleportOptions")
teleportOptions.ReservedServerAccessCode = reservedServerCode

SafeTeleport(game.PlaceId, {playerToTeleport}, teleportOptions)
Sending Teleport Data
When a player is teleported between places, any local data associated with that player is discarded. To handle data persistence between places, consider the following:
- If your game utilizes secure player data like in-game currency or inventory, implement data stores or memory stores to maintain data from place to place.
- To pass basic non-secure data from place to place, call
TeleportOptions/SetTeleportData|SetTeleportDataon theTeleportOptionsinstance before passing it through toTeleportService/TeleportAsync|TeleportAsync. Keep in mind an exploiter can spoof this information.
local Players = game:GetService("Players")
local ServerScriptService = game:GetService("ServerScriptService")

local SafeTeleport = require(ServerScriptService.SafeTeleport)
local RNG = Random.new()

local playerToTeleport = Players:GetPlayers()[1] -- get the first player in the game

local teleportData = {
    randomNumber = RNG:NextInteger(1, 100);
}

local teleportOptions = Instance.new("TeleportOptions")
teleportOptions:SetTeleportData(teleportData)

SafeTeleport(game.PlaceId, {playerToTeleport}, teleportOptions)
To get a player’s teleport data once they arrive, use the Player/GetJoinData function, which returns a dictionary including the teleport data sent with the player.
local Players = game:GetService("Players")

local function onPlayerAdded(player)
    local joinData = player:GetJoinData()
    local teleportData = joinData.TeleportData
    local randomNumber = teleportData.randomNumber

    print(player.Name .. "joined with the number" .. randomNumber)
end

Players.PlayerAdded:Connect(onPlayerAdded)
Creating Custom Teleport Screens
When a player is being teleported to another place, they will see the standard Roblox loading screen while the new place loads in. To improve immersion, add a custom teleport screen by calling TeleportService/SetTeleportGui on the client and passing through the ScreenGui to use before teleporting the player.
local TeleportService = game:GetService("TeleportService")
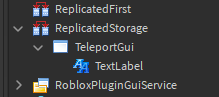
local ReplicatedStorage = game:GetService("ReplicatedStorage")
local teleportGui = ReplicatedStorage.TeleportGui
TeleportService:SetTeleportGui(teleportGui)
This example sets a premade ScreenGui located in ReplicatedStorage as the teleport screen. When the player teleports, they see the screen while the game loads. Any scripts inside of the ScreenGui will not be run.